Showing posts with label Cards for Men. Show all posts

Monday, 18 January 2016

A Fun Interactive Card

Hello everyone!

First post of 2016 and we have the first snow of the year today too! It wasn't very deep but it sure looks pretty. The snow didn't last very long though but it feels cold!!

So let's get on with sharing today's card. It's always a struggle with cards for boys/ men. I don't own many "male type" stamps. (Maybe that is what I should be investing in this year!! ^_^) But hey, there's nothing to stop me from creating my own "male type" image. Since we crafters have so many snippets of papers and cards, why not try to use them?! I cut various shapes by hand and constructed this cute robot card.
It was fun making this card. It's kind of like a puzzle, trying to put different shapes together and seeing what kind of robot you can come up with. The cogs are easy to create too. Use a circle shape and simply cut off equal sections towards the centre. It's not precise. No measuring, just eye ball it. It doesn't matter if it gets messy in the middle. Just use another circle shape to cover it up. Ta-da! There you have your cogs! Cogs have to move to keep the robot going. So I can't resist making an interactive card! By using a split pin, the biggest cog can move away to reveal  the 'Happy Birthday' message underneath.     
Here is a close up photo. Love the gold corrugated card. It just adds texture! I also noticed that I didn't use any stamps on this card today. Ha! It's a stamp free card. That doesn't happen often. I hand drew the faux stitches, robot's mouth and fuel meter and used a few peel off stickers too. (Peel off stickers?? Ha! One of those crafty things that finally sees day light again!! Hee hee! ^_^)      
I hope you like this card. It's a bit different and unique! 

Challenges entered:
See you all very soon!


Tuesday, 2 June 2015

Let's Celebrate

Hello there!

Quick post today. I just want to share this card I made a couple of days ago.
Male cards are often difficult to make. I believe clean and simple is the trick! I used the Free Spirits stamp set from Paper Smooches for this card. No fuss, just simply stamp them directly on the card. This is probably one of the few fast cards I have made! ^_^
I don't know, maybe certain inks are just not made for solid stamps (I mainly use Memento dye inks and Brilliance pigment inks). Some are better than others. The champagne glass here turned out to be very blotchy. I also figured out that with some inks wiping across the solid stamp works better than tapping or dabbing on the stamp. The ink seems to go on much better. By wiping, it also gives you this nice fine line effect. This can be clearly seen on the far right hand side bottle. Anyone have this problem? Is it the ink or the stamp? Maybe I should invest in some better quality inks or should the solid stamps be treated in someway so that it takes the ink better?? Love to hear from all you crafty friends out there. 
 
I will be linking this card to the following challenges:
Thank you for stopping by. See you soon.


Tuesday, 26 May 2015

A New Technique- No Line Watercolouring

Hello Tuesday!

I'm playing along with the Lawnscaping Challenge No. 106 today. It is about trying a new technique.

I love the look of images with no line colouring. I've seen them often on various blogs these days and I just know that I would have to give it a go someday. So that someday is today! I am trying this new no line colouring technique by using watercolour. Here is the finished coloured image:
This image is created by using Lawn Fawn's Critters from the Past and Beep Boop Birthday stamp sets. This took me a while to colour. I guess it is because I am not used to it. I wasn't quite sure where or how to start. I think the dinosaur turned out not too bad but I am not sure about the palm tree. No line colouring.... so maybe I shouldn't have such a defined lines on the palm tree leaves? Mmm... need some advices and comments about this. Anyhow, I enjoyed water colouring this image. Colouring is very therapeutic!!

I then made this card based on the sketch on Friday Sketch Challenge #95.

Here is the full picture of my card:
I am also taking this card to the Pixie's Snippets Playground - Weeks 178 and 179. Small pieces of white cards, stripy pattern paper and yellow card are all from my box of scrap papers/ cards.
 
Trying out a new technique is fun. It is the only way to learn and a good way to know whether you like the new technique or not. I do like this no line colouring technique but I do believe certain images are more suitable than others. I will give this no line colouring another go when I spot a good image to colour in. ^_^
 
Enjoy the rest of your week and I will see you soon.
       

Friday, 19 September 2014

Enjoy the happy times in life!

Hello there!

YEAH~ It's Friday!! ^_^ The best day of the week! (Of course, Saturdays and Sundays are even better!! Hee hee!!) Nothing special is planned here for the weekend but a few birthday cards are needed soon so I will be happily crafting away during this weekend.

I made a card the other day based on the current sketch challenge at Make The Day Special. The sketch is simple and easy to follow.
I made this card for a work colleague's birthday. Here is my card for this challenge.
Instead of a straight line, I used the largest scalloped border die from the Stitched Scalloped Borders Die set from Lawn Fawn to create a more interesting look. You will be able to see the scalloped edge and the partial cut circle more clearly in the photo below. To depict the colours on the blue and pale yellow-green striped ribbon, I layered an extra scalloped border in apple green to the blue scalloped edge.
For the main image, I used the Honey Bunny stamp set from Mama Elephant. I had fun dressing up this bunny by adding the top hat, bow tie and the monocle. I also added Glossy Accents on the monocle to make it look more like there was a piece of glass inside it.
The circle sentiment is from my own stash. I bought it a while ago when I was at the NEC Hobby Crafts show. I really don't know which company product this is from as it was loose on its own when I bought it. I would love to know if any of you recognise this stamp.

Oh~ I also added the same washi tape and ribbon inside the card. I carefully lined up the pattern with the washi tape and ribbon just below the bunny so when the card is closed it runs as if it is a continuous strip.
Of course, for this card, I used some cards and papers from my box of scraps so I am also entering this card to Pixie's Snippets Playground - Week 142. Phew! I think I am just about to make it with 11 hours to spare. ^_^

I hope you like this card as much as I do. Thanks again for dropping by and enjoy your weekend!

Thursday, 7 August 2014

Summer Apron Shape Card

Hi everyone!

Don't you just love summer?! Although we had a few rainy days here and there, a majority of the time it has been beautiful sunny days!! I just love the fact that it is warm and I can simply go out without a coat or jacket.  Also, what could be more exciting and fun than inviting friends over to have a barbeque in the garden so I made this invitation card in an apron shape:
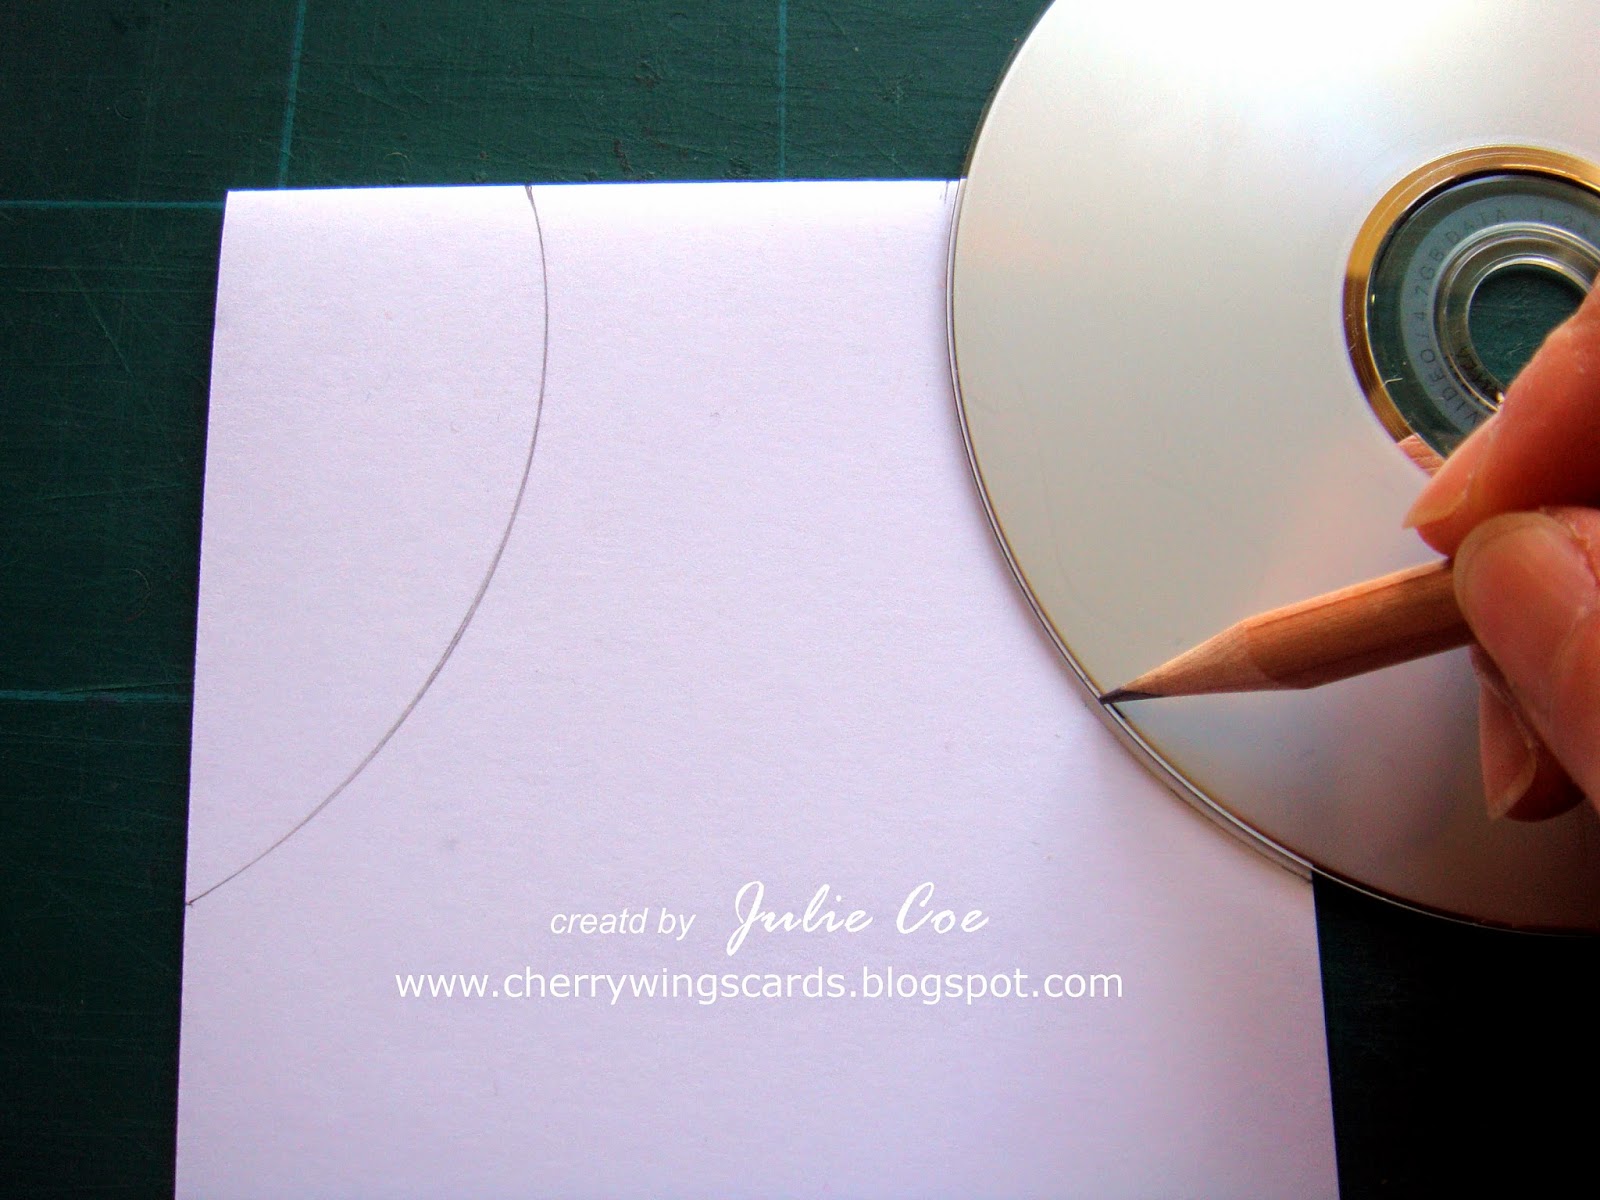
I tried to make it not too girly so that it can be for both male and female. For the apron shape, I simply took a plain white card and folded it at the top. Then, I used a CD to draw a curved line on both sides and cut these out.
To make the little pocket at the front, I simply adhered foam tape on 3 sides of a small card. This leaves an opening for the tag where you can add all the party details on it. 
Here is a closer look of the card. I used scrap papers, hand cut various pieces and assembled the skewer, burger and fork together by using a small amount of glue. Then, the words were stamped by using white ink. Blue eyelets were also used so that ribbons could be threaded through.  
Of course, with this card, I will join in Virginia's View Challege #6: Shape Card. This is a fun challenge. It is great to break away from the usual square or rectangular cards. There is something unique about shape cards!! Love them!!  ^_^   
Edited: How can I forget??!! As I used some scrap papers (snippets) on this card, I would also like to take this card to Pixie's Snippets Playground - Week 136. Thanks Di for reminding me! Playmates, here I come!! ^_^ 
 
Have a lovely evening. Weekend will be here soon! Yippee~


Thursday, 26 June 2014

Let's Celebrate - Paper Smooches SPARKS Challenge

Hello hello!

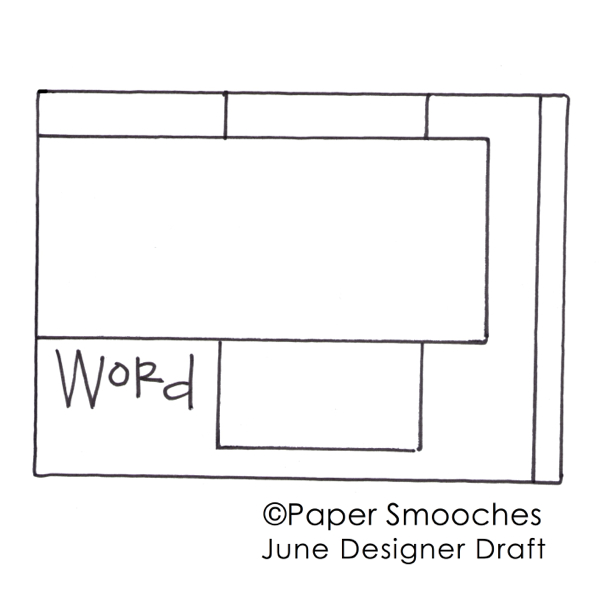
Many of you may be familiar with Paper Smooches stamps, however, this sure is a new brand for me. I fell in love with its bold and quirky images and interesting sentiments and fonts. This Free Spirits stamp set caught my eye as I needed an "adult" set! ^_^ What's more, it also means that I can finally join in the fun on the Paper Smooches Sparks challenge blog which I have followed for a long time. This week (June 22-28) is the Designer Drafts challenge and we have a sketch:
http://papersmoochessparks.blogspot.co.uk/2014/06/june-22-28-designer-drafts-challenge.html
So here is my first take of using Paper Smooches stamps and dies.

As coordinating dies are also available with this stamp set, this makes it so much easier to create a shaker card.

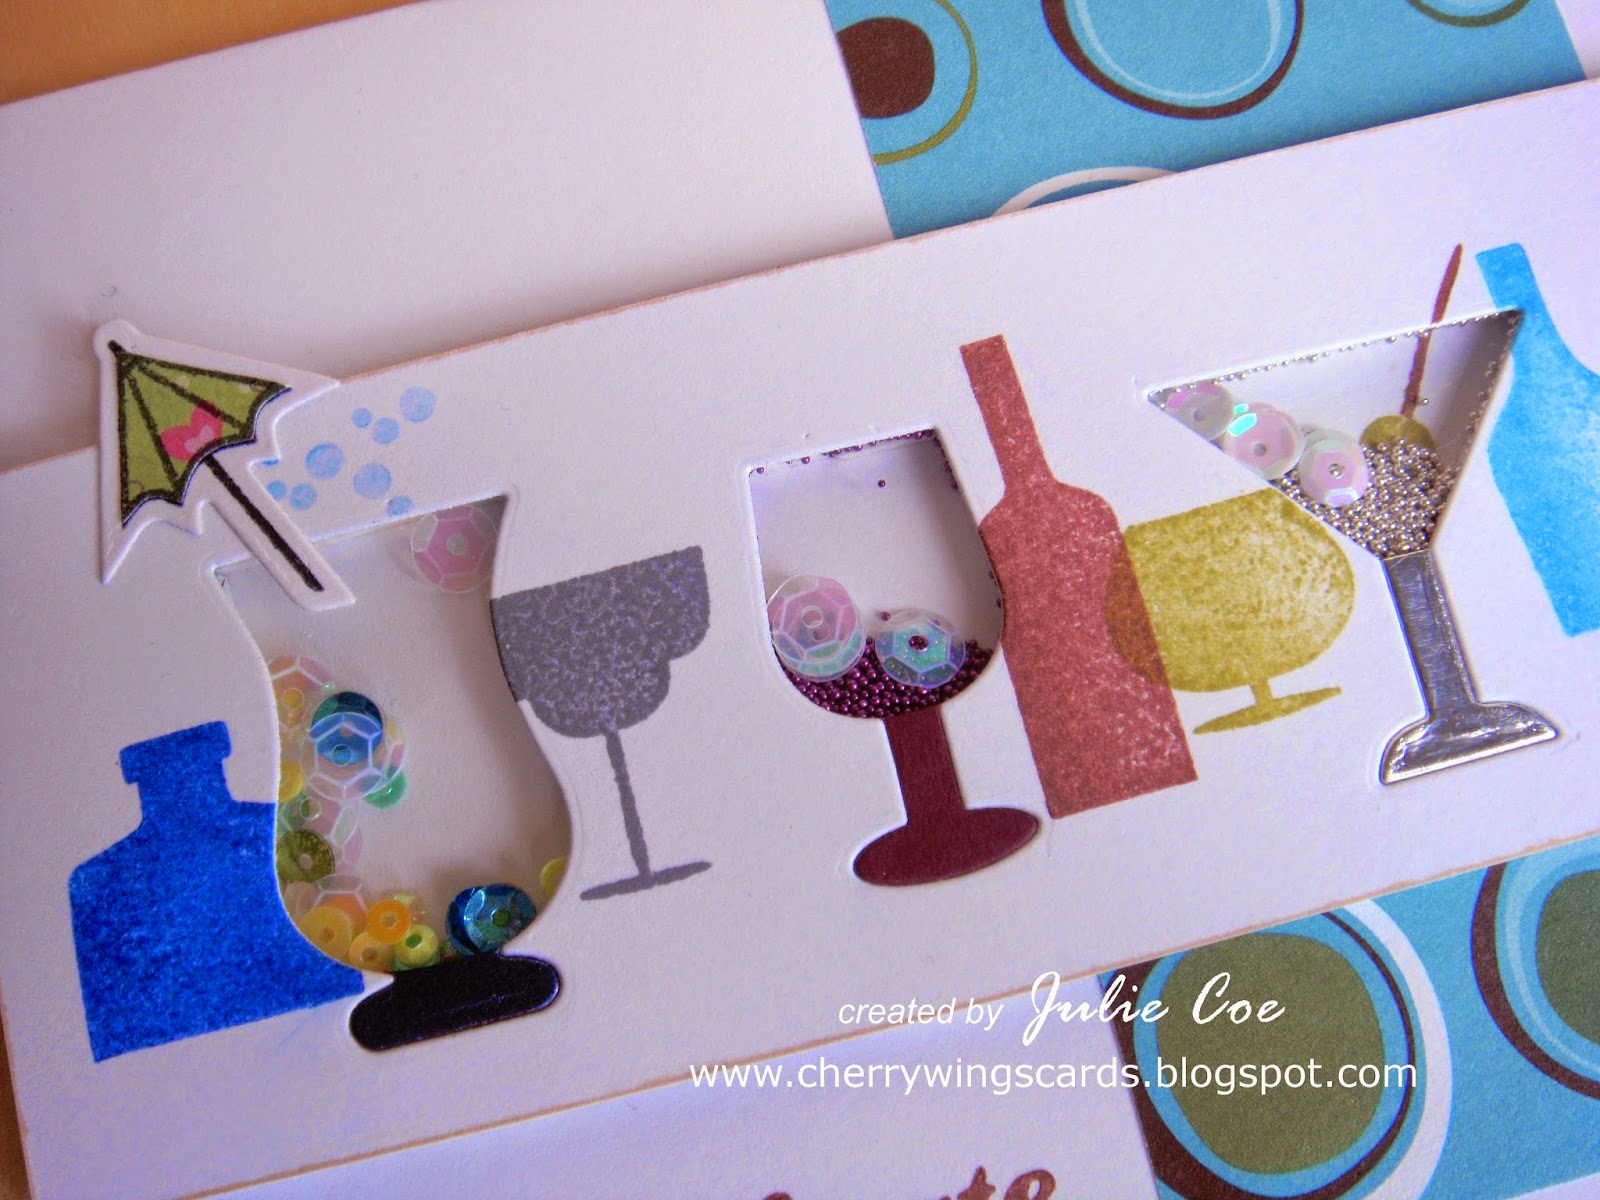
This card is for a friend of mine in Taiwan. Although he doesn't drink much, I am sure an occasional birthday sip with friends would be a jolly good idea! I followed the sketch exactly and tried to make it so that it appeals more to males. (You all know how difficult it is to make masculine cards!) Here is a closer look.

I was slightly annoyed that my effort of stamping the olive in the martini glass was covered by over loading the micro beads. I made sure that I moved the sequins and micro beads out of the way so that you could see the olive hiding in there!! : P

Apart from the olive (Doh!), I think the card turned out quite well. I certainly had fun playing with these stamps and dies. Are you new to Paper Smooches too? Maybe you would like to join in too?

 
I will also be adding this project to the Simon Says Stamp Wednesday Challenge: Anything Goes.
 
Enjoy the rest of the week!


Tuesday, 17 June 2014

Virginia's View Challenge #4

Hello Hello!

This month at Virginia's View Challenge we have a Tag and Scrapling Challenge. The twist is to incorporate a recycled item into the project. I think I still can make it!
http://virginiasviewchallenge.blogspot.co.uk/2014/06/virginias-view-challenge-4.html

It was Father's Day here in the U.K. last Sunday. I needed a tag to go with the presents that our girls wanted to give to their wonderful dad, my lovely husband that is! ^_^  I thought I would challenge myself to see if I can make the whole tag out of recycled items. As I needed the tag quickly, I just grabbed whatever items I had near me. So this is what I came up with.

I think the red patterned card was originally from some sort of tea or chocolate box. I cut it into a basic tag shape. The grey tag was actually the clothes tag from a pair of jeans. The price sticker is still stuck at the back of that tag! Ha ha! As it has that rustic feel to it, I decided to stamp "YOU ROCK" on a piece of leftover kraft paper, then hand tore and inked the edge to keep that rough look. Afterwards I found this beer bottle cap lying around. Hey! Why not?! I used foam pads to attach it to the bottom right hand corner and added two hand cut heart shapes from scrap papers to it.

Finally, I hand drew two arrows with white gel pen, added some sequins, applied Glossy Accents on hearts, sprinkled some glitter and attached the string from the original clothes tag to my tag. I believe I have made the whole tag out of recycled/ left over items! (Well.... apart from the sequins I guess!) This will also be a perfect project to take over to Pixie's Snippets Playground - Week 129.

I hope you like my 99.9% recycled tag!


Tuesday, 18 June 2013

Daddy's Day

Hi Blog World!

Gosh~ When was the last time I blogged??? Naughty, naughty, naughty!! I'll need to try to work on this a bit harder!

Anyway, did everyone have a great time with the dads yesterday on Father's day? There is this quote that I think is so true:

"Anyone can be a father but it takes someone special to be a dad!"  

And I just love this quote!

We had a pretty normal day yesterday but it is being together with him and spending time with him that counts!! The girls made cards for their dad and here is the card I made for him- A clean and simple card.

I am joining the card challenge at CAS(E) this Sketch! #32 and here is the picture of this week's sketch.
 
I will also be joining at A Gem of A Challenge #84 - Father's Day.
 
A short post and hope to see you soon again!
 

Wednesday, 20 February 2013

You're a Star!

Hello there~

Hope you all had a good day today. The weather is still cold here in the UK. Can't see any sign of spring yet. Apparently it will get colder as the days go by this week and we might even see some more snow. That just gets a bit boring now! I've seen snow already this year, maybe a bit of green and warmth will be better. smilies  Mm... I think I should stop waffling now and get on with the card sharing. I am sure, for most of you, that is the reason why you are here.

Today I want to show you my CAS card. I don't do Clean And Simple often. This is something that I should really learn to do more. So here is the card.

 The CFC90: Black & White plus one colour challenge at CAS-ual Fridays sounds fun so I decided to have a go. Then I came cross this other blog- CAS(E) this Sketch! and love the look of their sketch on challenge #15:

CAS(E) this Sketch! #15
So I combined the two challenges for this card. (Oh dear~ I'm too late to enter CAS(E) this Sketch! this time!!tongue smileysI'll be quick next time!)

Here is the side shot of the card. It was such fun to make the clapper board again. It reminds me of my wedding day. Me and my husband love films. We actually made similar clapper boards, like this one, as the place name cards for all our guests. I remembered that we were still folding, colouring and sticking these little cards the night before our wedding day.
 
And here is a close up shot of the clapper board. I used a white gel pen to draw the lines on the board and die cut the large star and added a little punched glittered star at the bottom corner. As for the sentiment... I wrote it by hand! Hope it doesn't look too bad.
 
It took me a while to get used to the large white empty space. Even my daughter asked me "What are you going to put on that white area, mummy?" I guess this is not my usual style but I may start to like it!!
 
Enjoy the rest of your week and hope I'll be back blogging soon!


Tuesday, 13 March 2012

Finally, here is the card for my brother-in-law

Hello there!

Got to be quick on this post as I have a husband with man flu and a daughter complaining of a blocked nose. My throat just started to feel sore too. Oh dear~ hope we are not all going to get this cold!!

It was my brother-in-law's birthday last Friday. After making a birthday card for no one (see last post), I used the image that I'd already coloured in last time and made him this card.

My brother-in-law loves penguins. This image is a freebie from Bugaboo Digi Stamps. Just love all the presents that the penguin is holding, particularly that ice cream on the top!!  Here is a close-up of the digi stamp.

This is the first time that I've done zig-zag faux stitches. It didn't turn out too bad, I thought!

Well, better go now to look after my poorly loving people.

A challenge or two:
Sweet Sketch Wednesday #144-43


Willow Sketchie Challenge - use ribbon or twine
I've used a blue and gold ribbon at the bottom of my card.

Have a nice evening!