Wednesday 11 December 2013

Just made it!

Hello!

Hope you all had a nice week so far.

Mine is all busy, busy, busy! However, I had a chance to have a go at the 10 Minute Craft Dash #31 the other day while my daughter was poorly at home. Here are the colours this week:
Colours: light yellow, bright red, green
I guess I am still in the Christmas mood so these colours just shout at me with Christmas cheer! Every time I play at 10 minute Craft Dash, I always feel like I am in some sort of game show. Nerve racking and exciting! My hands shake and my heart pounds fast, just to ensure that I stick to the 10 minute deadline. How did I do this time? Well, close! I mean very close! I finished the card in 9 minutes and 58 seconds. Phew~ and I made it!! ^_^ Here is the finished product:
 
 
10 minutes is not long. So die cuts and embossing folders certainly help to speed up a few things. I used:
  • Nellie Snellen multi frame's (MFD 020) - used the negative part 
  • Cuttlebug D'vine Swirls embossing folder
  • Sizzix Sizzlits Wreath die 655259
  • Sequins bought from pound shop
  • Chip board sentiment free from craft magazine

I love this colour combination. Very bright and cheerful! Now off to make my daughter's birthday card. You might just see that in the next couple of days! ^_^




Tuesday 10 December 2013

Snoozing Santa

Only 15 days till Christmas!! Ahhh..... are you all ready?!

How about sharing another Christmas card? (Well, I am certainly not ready if I am still making Christmas cards!! Hee hee! ^_^)


Doesn't Santa look sweet when he is asleep? I used the clear stamp 'Snoozing Santa' by Helz Cuppleditch for this card. To take some of the thinking out of me, I used the sketch C014 from Crafts 4 Eternity Recipe Challenge #153.

I had fun making this card. As this is quite a large image, I decided to paper piece the majority of it. This also gave me the chance to use up lots of little scraps of paper from my snippet folder so that I can join in the fun at Pixies Snippets Playground - Week 102.


Santa's face, hands, outfit, hat, socks, cat and rim of the sofa are coloured in by using Copic markers. The rest are paper pieced. (Well, I did colour in the polka dots too.) The "For Santa" tag is propped up by using sticky foam. Then, a layer of Glossy Accent has been added. Crystal Stickles has also been added on the white part of Santa's hat. What else? Oh~ the sentiment is from Lawn Fawn's Cozy Christmas stamp set and backing papers are free gifts from craft magazines.

I am also entering this card to
Now these Christmas cards are made, maybe it is about time to write them! ^_^ Have a nice day!


Monday 9 December 2013

Lawn Fawn CHA 2014 Catalog Challenge - Card 2

Happy Monday!

Woo hoo! This is my 100th post, now that is something to celebrate! ^_^

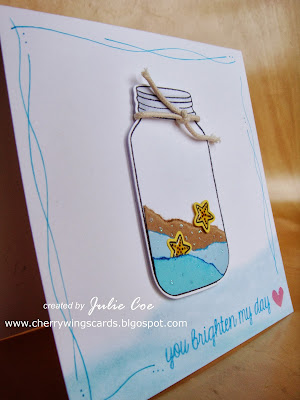
I am here today to share my second Lawn Fawn card to be entered in the Lawn Fawn CHA 2014 Catalog Challenge. I used the Summertime Charm stamp set again. This card idea is taken from my previous card here. I had to recreate the card so that there were no washi tapes and no other stamps from other companies. However, I still like the idea of having a jar of sea, sand and starfishes. So here is the card:
 
I like the simplicity of this card. All the blue colours and wavy lines add a cool and floaty feeling to the card.
 
I added some dots on the stars to make them into starfish. Then, I added Glossy Accents on them and the heart at the bottom right corner to make them stand out. I also added little dots of Crystal Stickles to represent the bubbles at sea. 

I hope you like my little jar of the seaside! ^_^


Sunday 8 December 2013

Lawn Fawn CHA 2014 Catalog Challenge - Card 1

Hello,

Hope you all had a wonderful weekend!

I simply love Lawn Fawn designs! Their stamp sets, dies and papers are just so cute! Although I don't own many of their products (it's hard to buy in the UK), as soon as I saw the Lawn Fawn CHA 2014 Catalog Challenge, I just had to try and give it a go!!

I could enter the challenge by using previous Lawn Fawn card I made (see here). However, as the rules stated no patterned paper and no other company's stamps, I had to recreate a new card but used the same idea.
 
 
All stamped images and the sentiment here are from the Summertime Charm stamp set. This is the very first Lawn Fawn stamp set that I purchased. I also bought the coordinated die which makes cutting out images so much easier. I just love this little jar. You can literally fill anything you want in it!!   

Ribbons and sequins are from my own stash. To add shine and glitter on some of the stars, crystal Stickles glue has also been added.

I will be back with another Lawn Fawn card tomorrow.

Thursday 5 December 2013

Heartfelt Christmas Wishes

Hello there!

Remember what I said in my last post?! I love the brilliant sketch from Seize the Sketch #9 and I think I may just have to use it a few more times!

So here it is! Another card using the same sketch. In fact, it is very similar to the card I made last week (see here). Since the main image is not as busy as the last one, I decided to add some sparkle by using Stickles on the embossed background (hopefully this shows up on the photos) and some red gems. I also added a red washi tape across the bottom of the card and a larger frame for the sentiment.

I have used foam tape on one of the gloves and on the sentiment frame to create dimension. The  two photos below should show the dimension better and, hopefully, you can see the sparkles on the card too! 
 
 
Challenges to enter:
Haven't really counted how many cards I've made for Christmas this year. Will it be enough? I bet I will still have a mad rush this weekend!! ^_^

Sunday 1 December 2013

Joyful Wishes

Hello Sunday morning!

I am up early today so that I can squeeze in my 2nd card for the Pixies Snippets Playground- Week 100.

The blue dotted background paper and the snowflake embossed white card are from my snippets folder. I also used a tiny small piece of patterned paper to paper-piece the snowman's scarf and ear muff. I have this wonderful tingling sensation every time I use the tiny-winy piece of paper/ card from the snippets folder. Somehow I get this "I've saved the world" feeling when I use up scraps!! Do you have this feeling? Or is it just me? Ha ha!

I just love Lawn Fawn's Making Frosty Friends stamp set. The snowmen from this set is just so cute and the fact that you can dress up your snowmen just brings back my childhood memory of playing paper dolls!

I followed the sketch from Seize the Sketch #9 for my card. Another brilliant sketch, which I think I may just have to use a few more times!!
 
I am also entering this card to crafts 4 eternity: R#152 - Non Traditional Christmas. I do like blue, pink, purple, apple green and silver, the non traditional colours, for Christmas. In fact, my Christmas baubles are in all those colours! ^_^

Enjoy the rest of your weekend!


Thursday 28 November 2013

It's My Birthday~

Well.... not really!

It will be my daughter's birthday soon and I made some birthday invitations for her a couple of days ago. Here are the invitations that I made.

I was going to say: "Mmm... this will be a break from sharing and looking at all those Christmas cards!" But I guess as her birthday is near Christmas, these invitations do have a bit of a Christmas feel to them too! ^_^
 
Luckily some of the left over patter papers are still large enough so that I can make 4 cards out of them. However, I ran out of the red holly and berry patter papers and had to cut a section out from the middle to layer it under the sentiment. Thank God the main stamped image is on top of it and covering it, otherwise you would see the hole in the middle!! : ) 
 
  
I used Pergamano- Summer Fairies stamp set (Code 41906) for my main image and used computer to print my own sentiment. I also used white Liquid Pearls to decorate the fluffy furs on the clothing  and Crystal Stickles on the wings.

Invitations will be out in the next few days and hope all these little girls will be happy to receive them! ^_^

Few challenge entries:
I will be back soon maybe for some more.... Christmas cards!! (Did I hear you scream? Ha ha!)

Have a nice day!


Friday 22 November 2013

Used A Sketch and Some of My Snippets

Hooray! It's Friday!

I get so excited when it comes to Friday. That last working day feeling of the week is indescribable!! Just loving it! ^_^

Here is a quick card to share for today.
 
Simple layout by using the sketch from Seize the Sketch #8
 
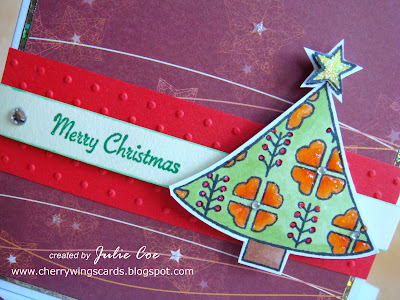
I wasn't quite sure about that backing paper that I used. I like the stars and wavy lines but was a bit sceptical about the colour. Burgundy and orange - not really for Christmas, is it? However, after I finished the card, my husband said it was a really nice card and looked stylish. So I guess it must be alright and works!! ^_^
 
Here are a couple more photos of the card. The Christmas tree image, from Beth Hughes Designs- Season's Greetings set (code: BHCSA6007), has been propped up by using sticky foam pads. Stickles, 3D Crystal Lacquerer and gems have been added to emphasise the image. 
 
 
I am also going to take this card over to Pixie's Snippet Playground #99 for the very first time. All papers are from my bag of snippets/ scraps. Sometimes I do surprise myself, even the smallest strip or piece of paper (that could be easily thrown away), ends up on another card!
 
Wish you all have a very nice weekend!
 

Tuesday 19 November 2013

3D Poinsettia Card

Hello Hello!

An early post for me today or should I say a late past midnight post actually!! ^_^ It will be a quick short one today as I should have gone to bed by now. Just want to share this card I made last Sunday. Yes, what else, another Christmas card!
 
I've accidentally found two packets of Craft Creations Gold Label Peel-off stickers. God knows where they have been hiding! You wouldn't believe this. I bought them about 4, 5 years ago when I first visited the craft show in the NEC Birmingham. I totally forgot about them! Now they have been discovered, I'd better make good use of them.
 
I stuck each four-petal peel-off sticker on acetate then roughly followed the outline and cut them out. As they were on clear acetate, any imperfect cutting will not really show. Then, I simply shaped the petals and used glue dots to stick them on top of each other. There you have it, a pretty 3D poinsettia flower. Here are a couple more photos: 
 
 
I love the fact that these are glittered peel-off stickers. This will save me from adding it!
 
The layout is from CAS(E) this Sketch #54. It is an easy and simple to follow sketch.


I also decided to use the recipe from Crafts 4 Eternity R#150 - Tic Tac Toe. I chose 3 from the last row- 'Christmas theme', 'Stickers' and 'Red'. In fact, apart from the poinsettia, the strip and frame are all stickers too. Yep, another item which I had for a long time and neglected it!! Hee hee! Naughty! ^_^

Alright, it's meant to be a short post, but turned out.... not so short?! Anyway, hope you have a great day!

Sunday 17 November 2013

Another Christmas Card

Hello Friends!

First I'd like to welcome my two new followers: Diane and Darnell. Di is the owner of Pixie's Crafty Workshop blog where she also runs Snippets Playground weekly. I've only just discovered Di's blog recently and it is wonderful and inspirational. I will join in the Snippets Playground sometime by using up those snippets/ scraps which I'm sure all crafters have loads!! As for Darnell's blog djkardkreations, its fun and she has the most amazing "Playhouse" where she crafts all her creations.  It's worth having a look and you will be amazed. Thanks for following my blog. I hope you will like my blog as much as I like yours!

Now I should get on with sharing the card I made this morning. It's another Christmas card and I hope you aren't fed up with them yet, as I will probably be making a lot of them. Well, it is nearly Christmas. I mean just 5 weeks and 3 days! Eeeekkk.....!!! ^_^ Here is the card:

I used the free Somebunny Christmas stamp that comes with the latest Quick Card Made Easy magazine issue 120. This stamp set is so cute! Here are some more photos taken from the side and close up of the card:
 
 
I had fun colouring the image with Copic marker pens. Glitter (Crystal Stickles) has also been added on various areas of the image. Glitter is a must for Christmas cards or in my case- any card!! ^_^
 
I used the sketch from Just Add Ink #191 this week as my layout. I also hand drew some lines, dots and hollies around the half circle pattern paper. Thus, I will enter this card to Craft Your Passion challenge #188- Add Some Doodling.
 Enjoy the rest of your weekend! Hope to see you here soon!
 

Tuesday 12 November 2013

Mmm... not sure...

Hello Friends,

It will be a short post today as it is near bed time! Wanting to join in with the CAS(E) this Sketch #53 this week. Here is the sketch:

I found this sketch quite difficult. Here is the quick card I made tonight:
 
 
I am not sure if I like it or not? I have followed the sketch exactly. Using felt, I hand cut and stitched  two holly leaves. I attached a red button for the berry and added a bow on top. Photos are never great when taken indoors at night. They always look yellowish. Will try to take another one during the day time and replace it. (Edited: Photos now replaced. It captured the colours a lot better. Also added a close up shot.) By then, hope this card will have grown on me.
 
That's it for now.