Sunday, 6 December 2009

Slider/ Spinner card

Hi, I bet you were all wondering where I've been? I have been busy fulfilling my Xmas card orders this year and I just ran out of time to blog. But here I am again. ^_^

Today, I am going to share my first slider card. I previously saw this project being shown in a card magazine and I have also found some tutorials on Youtube. Since then I have been dying to have a go! Soon after, I had a male birthday card order from my friend and she has asked for a space/ science fiction theme. So I decided this will be a good chance for me to incorporate this technique.

Here it is, my space rocket slider card.


I have found this font called "Distant Galaxy" on my computer. This is just perfect for my space/ science fiction theme as I instantly recognize this font as the Star Wars movie title font. I printed the recipient's name out and used it as a template to cut the letters out from the card. Then I used white liquid pearl to add little dots on each letter to make them look like bolts. I designed the rocket myself and assembled it together by using various coloured cards. The rocket was attached on a round foam pad which was sandwiched between two round stiff cards. (All tutorials have shown this technique by using two coins. However, I think two coins could add on to the weight of your card consequently increase your postage cost if you are mailing your card out. Using two stiff round cards works just as well as using coins.) This round foam pad slides along the cut out channel, which was raised up by more foam pads, from the base card. I believe you can use any shape foam pad to be sandwiched in along the channel. However, by using a round foam pad, this will also allow your image to spin round and round as it slides.

And.... this is what my original rocket does - slide and spin at the same time! But I thought a rocket will not be a rocket without a blasting flame. Thus, after adding yellow and red treads as 'flame', I guess the rocket became heavier on one side and the spinning mechanism did not work as good as before. But I am still proud of my first attempt at making this slider/ spinner card. I do not regret adding the 'flame' on as it really gives some texture to the card.


While the rocket slides (and spins a little) along the channel, it also reveals the greeting text message underneath. All the little stars and 'circular planets' are peel offs. Pearlescent cards have been used to give that little shine. And blue clear beads have also been used on the wire to hold the large star.

I love the card and the good news is my friend loved it too when she received it!

Hugs,

Thursday, 29 October 2009

Walking down the isle

My brother and sister-in-law got married at the Little White Chapel in Las Vegas a few weeks ago. (I know my post is late again! mad smileys) All friends and family also had the chance to join their wedding, well, not in person but through Internet. It was great to see the wedding ceremony live online. Almost feel like we were there with them. I have just got to share this wedding card, I made for them, with you all. I am so so pleased with it and truly love this card myself.


I made this card with our 'October monthly challenge: moving card' in mind. See those two gold and pink butterflies fluttering by?! (I should have taken a video clip to show you!) My sister-in-law loves butterflies, hence, they are everywhere. In order to create a little movement, I attached two of the small butterflies on thin acetate strips so they could move back and forth like they are flying. They are great!
Here comes the bride and groom walking down the pink carpet isle. When the card expands, it reveals the bride and groom's names and the date of the wedding. And it just looks like the couple are walking down the isle. I am so loving it! squeaky dog toys

Here is another photo from the side view.


My card did travel all the way to Vegas and so my brother and sister-in-law were able to open it after the wedding ceremony. What response did I get?! Well, they love the card. It is good to know when someone loves my card as much as I do myself. Hee hee! Have a great day!


STAMPS: Elzybells Art Stamps- Bride & groom (16-020).
INK: Memento Tuxedo Black.
Others: Cards, papers, ribbon and rub on alphabets from my own stash, Butterflies recycled from a given birthday card, Acetate and Copic Markers.

Sunday, 25 October 2009

Happy Birthday Dad!

Well... I know... My dad's birthday has gone past by already but I still would like to share the card I made for my dad with you.

And this is what it looks like when you open it:


I've seen this card style being made before and love the clever cutting and folding. However, I could never figure out how it was made. But I was put out of my misery on a special card demonstration day at my local craft store. Now I know how! small dog clothes I used some free die cut shapes of the little birdies, which comes with my craft magazine, to decorate this card. Although it is autumn already, the card still has that summer feeling with its green, blue and yellow colours. I guess I just want to hold on to summer a bit longer!! I am quite pleased with this card and so is my dad!! Hee hee!

I guess some of you are wondering: "SO... how do you make this card??" Well, to stop you crafters out there from wondering any longer, here is a picture indicating the measurements, where to cut and how to fold.

Sorry that the image seems to be really small. It is so small that you can't even read the text on it. But... I don't know how to make the image bigger?! smileys Basically, the card size is 12" x 5 1/2". Score the card at 2", 4", 8" and 10". Then cut 1 1/2" from the top and bottom edge: from the 2" point to the 10" point (shown as the red coloured line). The rest will be just folding. Light blue lines indicate valley folds and the yellow lines are the mountain folds. Hope this helps. Once you manage the basics, I bet you will be able to apply this cutting and folding technique to any size card. Happy crafting!

Thursday, 1 October 2009

Cherry Wings Challenge #2 - Moving Cards

Hey! It is my turn now to set up this month's card challenge. diving forum

For October Challenge #2, I would like you to design card(s) which include something that MOVES. Just to give you a head start how about a shaker card? You can use beads, sequins that move around when you shake the card. Or how about a Waterfall card? Or just simply create a card that has jewels or charms dangling on the card?

Anything else? We want to see those groovy movements on your cards. Please do come and join me and Erin on this month's challenge. Leave a link of your cards in the comments below or email me with your card pictures. I will showcase all your works at the end of this month. Have fun with the move! confused smileys

Wednesday, 30 September 2009

Showcase for Cherry Wings Challenge #1

It's the last day of September today. (Where has the time gone?!) And it's our showcase time to share the results of our very 1st Cherry Wings Challenge- Mid Autumn Moon Festival Card. So here they are!

This is the card which my friend Erin came up with:


I love the warm autumn feeling from the orange, the yellow and the brown colours of her card. I especially love that backing paper. It does create that Moon Festival mood. When I asked her where she got that paper from, it turned out that it was only a leaflet from Starbucks. It just shows that you can use anything to make cards with your imagination! The love birds stamp, I believe, is the free gift stamp from the February Cardmaking and Papercraft magazine issue 62. (I know that because I have that stamp set too!! dog mall) And don't you just love all that glitter reflecting the bright moonlight and shining everywhere! I love it!

Now.... here is my card or I should said cards:


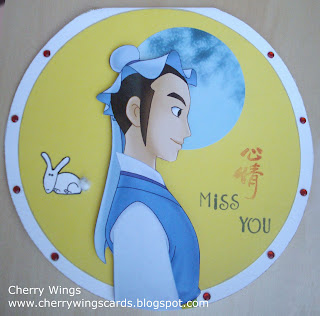
I have to be honest, this has been a very hard challenge. I certainly needed the whole month to come up with this pair of cards. From the very beginning I knew I wanted to make a circular card, as it resembles the big round moon of the Moon Festival. I also knew that I wanted to use 9 gem stones to represent the 9 suns. But what image to put in the middle of my card I surely hadn't got a clue. Until one day, I came across these two Chinese figurines from a magazine and that was it. Everything seemed to come together so easily.

The small rounded moon behind the lady was punched out from a beauty magazine too. And I just couldn't resist sneakily placing my Jade Rabbit on the card with its fluffy tail. There is a saying in Chinese that people miss their family and friends even more during special holidays or festivals ("每逢佳節倍思親"). Therefore, I thought the "Miss You" sentiment suits the card well.

Once I made the card with the Chinese lady, I just couldn't stop to make another one with the Chinese gentleman. The only differences between these two are the main yellow backing paper and the colour of the gem stones. I ran out of the lighter yellow colour paper so had to use another deeper colour yellow paper! smileys And to give the male card more of a masculine feel, I decided to use the strong red colour gem stones.


Well, I hope you have enjoyed seeing our 1st challenge results. I truly enjoyed making them. Please do come back tomorrow to find out what's in store for our 2nd challenge for the month of October.

Hugs,


Tuesday, 15 September 2009

Gorjuss Girl

Got some time to take up another card challenge last week. Actually I finished the card over the weekend but just haven't had the time to post it on the blog. Luckily I am still in time for entering The Sugar Bowl Challenge 19- Marlene's Sketch and this time you will also need to include the colours pink and brown.


I love the combination of pink and brown. They just look so yummy together! Reminded me of a chocolate cupcake with pink icing! (Even better with a cherry on the top! smileys) So here is my card:


I have had this sitting Gorjuss Girl stamp for a while and I finally found a chance to use her for the very first time. The sketch is easy to follow and I am very happy with my colouring by using Copic Ciao markers. (Just on the dress and skin though. I only got a few of the pink and skin colours so far. I need more marker pens in my collection!! scuba diving newsBut for my first attempt, not bad colouring huh?!) I have also made my own little beaded pink and brown flower to decorate the card. It is my friend Jai's 40th birthday on the 21st and I hope she will like it.

Thanks for looking.

Monday, 7 September 2009

Elzybells Birthday Card

Just want to share this card with you all.

I have used my winning "Life's a beach" stamp set from Elzybells to make this birthday card for my brother-in-law Marvin. There are a lot of stamps in this set but I just can't resist using this cute starfish stamp as my main image. I have coloured the starfish with chalk and added some shining gems. I have also raised the flower with foam pads to give more dimension. Finally the starfish has been layered on to another light blue card and on to a torn brown paper. The yellow flower boarder was created by using one of the stamps from this set too. Little drops of white opal Liquid Pearls have been added to the center of each flower. I have bought the FUN tags from my local store and I think they go quite well with this card.

I hope Marvin does like this card since my husband doesn't think that it looks like a man's card because of the flowers!! What do you think?


Hope you like it!

Wednesday, 2 September 2009

Cherry Wings Challenge #1

Me and my craft buddy decided to set up a monthly challenge. A way to keep our hobby going and an excuse to make more cards. As we are both very busy mums, I think we shall be able to cope with one challenge a month! Hee hee! animal smileys

So here you go, our very first challenge- make a Mid-Autumn Moon Festival theme card. First challenge set by my friend and... gosh! It is a difficult one. For those of you who are not familiar with the Moon Festival, here is a brief description from Wikipedia:

The Mid-Autumn Festival, also known as the Moon Festival, or in Chinese, Zhongqiu Jie (中秋節), is a popular harvest festival celebrated by Chinese people and Vietnamese people. In Malaysia and Singapore, it is also sometimes referred to as the Lantern Festival or Mooncake Festival.
The Mid-Autumn Festival is held on the 15th day of the eighth month in the Chinese calendar, which is usually around mid or late September in the Gregorian calendar. It is a date that parallels the autumn and spring Equinoxes of the solar calendar, when the moon is supposedly at its fullest and roundest. Farmers celebrate the end of the summer harvesting season on this date. Traditionally, on this day, Chinese family members and friends will gather to admire the bright mid-autumn harvest moon, and eat moon cakes and pomeloes together.

There are several traditional stories that go with the Mid-Autumn Moon Festival such as Chang'e, the Chinese goddess of the moon, the kind Jade Rabbit who lives at the Moon Palace, and Houyi the Archer who shot down nine suns.

This will be a very interesting challenge. I will be updating and sharing our cards soon when we have completed them. If this challenge tickles your fancy, you are very welcome to join us. You have the entire September to complete this challenge. If you ever participate, please do leave me a message below, email me your card or send me a link of your blog. We will definitely love to see what you have come up with!

Better get brainstorming and come up with some ideas.

Talk to you all soon.

Tuesday, 1 September 2009

You are growing up fast!

I can't believe that my friend Erin's little boy is 2 years old now. Time just flies! He is such a sweet boy and his facial expression is just amazing. When it comes to crying, he is definitely an actor! Ha ha!

Instead of using stamp images, I thought I would use die cuts this time. I used Ellison Design- Teddy Bear #1 die by Stu Kilgour for this card. I have also used the same flourish backing paper to die cut teddy's tummy. (You can see the pattern on his tummy is the same as the flower on the left hand side.) As usual, you will find the personalised name at the bottom of the card.


The card was made based on the sketch from Friday Sketchers blog week 64 design.


I quite like this sketch. You can interpret it in different ways. Instead of keeping the card in square shape, I cut the front card into a semi-circular shape, as shown in the pink area. When you open the card, it reveals the 2nd teddy bear and the greetings.

I have also decorated the envelope by using Ellison Design- Balloons #2 by Stu Kilgour.

Apparently my friend said her son loved it so much when he received it that he wouldn't let go of the card. He nearly tore the teddy off from the front which was propped up by foam pads. Glad he loved it so much as I do! ^_^

Have a nice day!

Wednesday, 19 August 2009

You are 5 today!

Why are cards for men/ boys so hard to make? They are just trying to be difficult!! unhappy smileys

My daughters were invited to my neighbour's little boy's birthday party at the Hollywood Bowl. Even until the morning of the party I still couldn't think of what card to make him. I don't have any stamp images which are suitable for boys. (This will give me some excuses to stock up some robots, pirates, cowboys, astronauts, dinosaurs stamps etc. next time. scuba diving) All I've got for making kids' cards are stamps of teddy bears, die cuts of teddy bears, stickers of teddy bears which I think are a bit babyish for a 5 year old boy. Finally, in my craft stash, I found some leftover wrapping paper from before. Crafters never throw away anything and it is right. You never know when it will come in handy. I used the image on the wrapping paper and layered the 'thumbs up' dog to created a simple 3D decoupage. Even the Happy Birthday sentiment was cut out from the wrapping paper. It only took me a very short 30 mins to finish this card. Just in time for the party. I think this card is perfect for a 5 year old boy, what do you think? Thumbs up?!


It's a boy!

My friend Atsuko gave birth to a little baby boy more than a month ago. Only until a few days ago, I managed to visit her and baby Higen. Mum and baby are both doing well. Higen is so cute, content and certainly has a lot of hair!

I made this simple quick baby card to go with a small gift of baby outfit.


I like to personalise the card with the recipient's name on it. And of course, I had to use baby blue colour for a baby boy card. What else?! scuba diving Little booties, little mittens, little bodysuit... everything little is just so cute! Babies are those special sparkly gems that fall from heaven!

Hugs,

Tuesday, 18 August 2009

You are the BEST

Yeah, here is me trying to catch up with my posts again! scuba diving

8th of August is our Father's Day in Taiwan and I made this card for my dad.

As you all know it is not that easy to make cards for men and I am quite pleased with this card. I accidentally came across this Inkspirations blog by Makeesha Byl. This blog is full of ideas, clear tutorials and Inkspirations challenges are held weekly. You should definitely go and visit! From this blog I found a very interesting and easy tutorial for making a Double Slider Card. So here is the result:


Pull out the slider and two cards appear at the same time from their pockets. I had great fun making this card. It sure is a surprise and has a WOW factor!

Hope my dad likes the card as he is the BEST dad anyone could have!